

Giving an artificial Christmas tree a snowy makeover is an easy way to elevate your seasonal décor, and a good flocking method can completely shift its look with minimal effort.
Whether you prefer a faint frost or a thicker snowy layer, learning how to flock an artificial tree puts you fully in control of the final style while keeping the process affordable and reasonably tidy.

In this guide, you’ll learn which materials work best, the step-by-step approach for smooth application, and key tips that help the snowy coating stay put through the entire holiday season.
With a bit of setup and a steady method, you can revive an older tree, reinforce your holiday theme, and craft a warm, festive focal point that feels thoughtfully finished.
Flocked Artificial Christmas Tree Basics

Understanding Flocked Artificial Christmas Trees
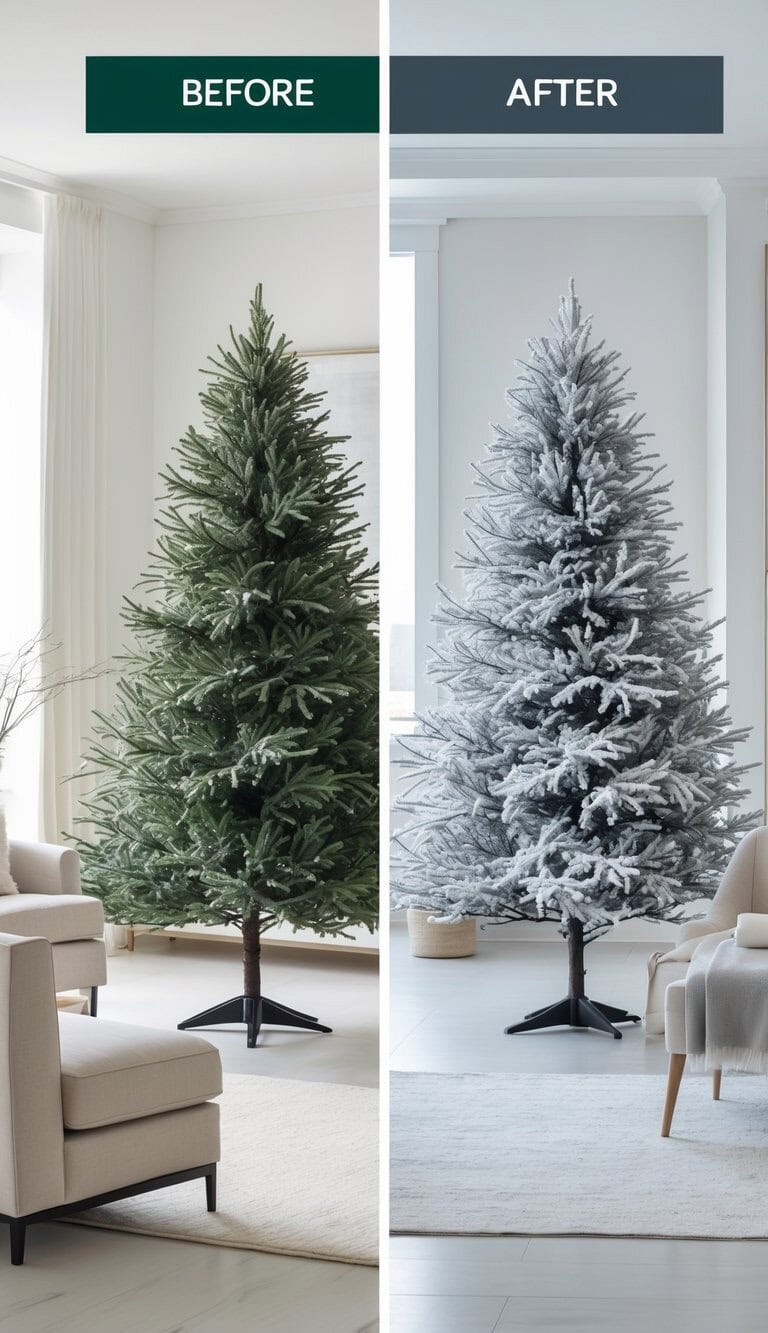
A flocked artificial Christmas tree gives a soft, snowy finish without the hassle of dealing with real branches. This snowy effect shifts the feel of your décor and brings a cozy winter vibe to your space.
What Is a Flocked Christmas Tree?
A flocked Christmas tree is simply an artificial tree covered with a white coating that resembles snow. The material is usually a powder or spray that clings to branches after a light mist of water. You can go light, leaving plenty of green visible, or create a thicker layer that looks almost fully snowed over.
You can purchase pre-flocked versions, though doing it yourself lets you control how heavy or subtle the snow effect appears. While flocked trees hold up well, rough handling can knock off small bits of the coating, so set them up gently and keep them stored in a dry spot.
Benefits of Flocking an Artificial Tree
Flocking adds a snowy charm that plain artificial trees lack. The white coating makes the tree stand out before you add ornaments, and it forms a smooth backdrop that helps decorations, lights, and garlands pop more than they do on deep green branches.
It can also revive an older tree that has faded over time. A fresh layer of flocking can shift its appearance and give it new life. You can keep it faint for a mild frost or apply a thicker layer for a dramatic holiday focal point.
| Feature | Flocked Tree | Non-Flocked Tree |
| Appearance | Snowy, white-coated branches | Green branches |
| Style | Wintry, cozy | Classic, traditional |
| Ornament contrast | Strong contrast | Subtle contrast |
| Maintenance | Needs careful storage | Simple storage |
Both versions have their appeal. If you enjoy a snowy holiday look, a flocked style is a great option. If you prefer something more traditional, a classic green tree is the better match.
Best Flocking Materials to Use

Choosing the Right Flocking Materials
The look of a flocked artificial tree depends heavily on the material you choose. Some options create a soft dusting, while others produce a thicker, textured winter finish. Picking the right product also makes the whole process smoother and far less of a hassle.
Flocking Powder Options
Flocking powder is the most common choice. It’s available in different textures and shades of white, and many versions are made from cellulose fibers that are safe and simple to work with.
You can choose fine powder for a gentle snowy coat or a coarser version for a fuller, heavier effect. Most powders need a light mist of water to stick. Spray the branches, sift the powder, then mist again to secure it.
Some powders come with adhesive included, trimming a step from the process.
Flocking Spray vs. Powder
Flocking spray comes in an aerosol can and creates far less mess than loose powder. It’s quick to apply and usually gives a subtle frosted effect, making it great for highlighting branch tips or refreshing a smaller tree.
For a deeper, snow-packed finish, powder generally delivers better coverage.
| Material | Look | Best For | Cleanup |
| Powder | Thick, textured snow | Full coverage, larger trees | More cleanup |
| Spray | Light frost | Quick accents, small trees | Easy |
If you’re working on a big tree, powder usually gives the strongest result. For tiny trees or light accents, spray works perfectly. Many people keep both on hand to experiment with different finishes.
Prep Your Tree Before Flocking
Preparing Your Artificial Tree for Flocking
Before adding any snowy coating, you’ll want to set up your workspace, get the tree in good shape, and shield the area around you. A bit of prep makes the whole project smoother and far less messy.
Workspace Setup and Safety Tips
Flocking can spread quickly, so pick a space like a garage, patio, or any open-air spot if possible. If you must work indoors, open windows and use a fan to keep air moving.
Wear a mask to avoid breathing in dust, and gloves to keep your hands comfortable. Goggles can help if you’re applying powder or spray with enthusiasm. Keep pets and kids clear of the area—flocking clings to fur, clothes, and nearly anything that passes by.
Cleaning and Fluffing the Tree
Start with a clean tree. Wipe it with a damp cloth or use a small vacuum to remove dust.
Next, spread out each branch so the tree looks full. Since flocking falls wherever it falls, a cramped tree will end up with uneven patches. Step back, check the shape from different angles, and adjust until it looks well-balanced.
Protecting Floors and Surroundings
Flocking tends to drift, so cover your floors with a tarp, plastic sheet, or old fabric. Secure the edges so they don’t slip as you move around.
If you’re near walls or furniture, hang sheets or painter’s plastic to block stray snow-like dust. This small step cuts cleanup time dramatically—just fold everything up afterward and shake it out or toss it.
Flock a Tree Using Powder

How To Flock an Artificial Tree With Flocking Powder
Using flocking powder is a simple layering process: add moisture, sprinkle powder, repeat as needed, then allow it to dry. Each step helps the coating cling well and look snowy for the season.
Misting the Branches
Begin with a light mist of water over the branches. A gentle spray helps the powder grip instead of sliding off. Avoid soaking the tree—too much water causes drips and uneven patches.
Work in sections, starting at the top. This keeps each area damp while you apply powder. A spray bottle set to a fine mist gives you the best control.
Applying the Flocking Powder
Once the branches are slightly damp, sprinkle the powder. A kitchen sifter or small strainer spreads it smoothly. Hold it above the tree and tap lightly for an even snowy layer.
Go slow. Dropping a large amount in one area can weigh the branches down and create chunky spots. After each sprinkle, mist again to help the powder bond.
Layering and Building Coverage
Flocking looks best when built up step by step. After your first pass, step back and note any thin areas. Repeat the process where needed.
A simple guide:
Light finish: one pass.
Medium finish: two passes with small touch-ups.
Heavy finish: three or more passes, giving extra attention to branch tips.
Layering gives you steady control and helps avoid clumps.
Drying and Setting the Flock
Let the tree dry completely before touching or moving it. Shifting it too soon leads to powder loss. Aim for at least 12 hours of drying time; heavier coats benefit from closer to 24 hours.
Use a garage or covered outdoor area so excess powder doesn’t spread through your home. After drying, shake branches gently to remove loose bits. Gloves help prevent rubbing off the new snowy layer.
Once everything is set, the tree is ready for lights and ornaments.
Flock a Tree With Spray

How To Flock an Artificial Tree Using Flocking Spray
Flocking spray offers a quick way to create a snowy finish with minimal cleanup. The process is straightforward: prep the spray, apply light layers, then let everything dry before decorating.
Preparing the Flocking Spray
Set up a workspace with plenty of airflow—outside or in a garage is ideal. Place a plastic sheet or old fabric under the tree to catch overspray.
Wear a mask and gloves so you don’t inhale fine particles or dry out your hands. Eye protection helps if the spray drifts.
Shake the can thoroughly before starting; most sprays need a solid minute of shaking for the texture to come out evenly. If you’re using multiple cans, keep extras nearby so you don’t run out midway through the tree.
Spraying Techniques for Even Coverage
The key to a snowy look is using light, steady passes. Hold the can around 12–18 inches from the branches. Too close causes clumps; too far wastes spray.
Start near the top and move downward. Short bursts give you more control than a constant stream. Step back occasionally to check the tree from different angles.
For a heavier snow effect, let the first layer settle briefly, then add more. For a subtle frost, one slim coat is usually enough. Aim mostly at the branch tips for a realistic finish.
Drying and Final Touches
Allow the tree to dry fully. Most sprays set within 6–12 hours, though humidity can slow the process. Avoid moving the tree while it dries or you might smear the coat.
If you spot thin areas afterward, add a small touch-up rather than blasting the whole tree again. Once the surface feels dry and firm, bring the tree inside and start decorating.
Care Tips for Decorating a Flocked Christmas Tree

Decorating and Maintaining Your Flocked Artificial Tree
A flocked artificial Christmas tree looks its best when the décor is placed with some care. The right lights, ornaments, and storage habits help protect the snowy finish and reduce shedding through the season.
Adding Lights and Ornaments
LED lights are a smart pick since they stay cool and won’t disturb the flocking. Wrap the strands around individual branches instead of stretching them across the surface; this keeps the coating from breaking off.
Choose lighter ornaments whenever possible. Heavy pieces can pull branches downward and dislodge the flock. If you still want to use weightier décor, hang those closer to the trunk for extra support.
Step back occasionally to check balance. If you notice thin spots, fill them with small accents like berry picks, pine cones, or ribbon clusters—these add fullness without stressing the branches.
Touching Up and Repairing Flock
Some shedding is normal over time. For a small thin area, mist lightly with water and sprinkle a pinch of flocking powder. Let it sit until dry.
For larger sections, add the flock in soft layers instead of one heavy application. Allow each pass to settle before adding more so everything blends smoothly.
Tiny touch-ups can be handled quickly with flocking spray.
Wearing gloves prevents hand oils from rubbing off any snow-like coating.
Storing a Flocked Artificial Tree
A flocked tree needs gentler storage than a standard artificial tree. A sturdy storage bag works well, or the original box lined with plastic to catch stray flock.
Keep the tree in a cool, dry spot. Excess moisture can affect the finish, and extreme heat can warp components.
When packing it up, fold the branches slowly rather than forcing them downward. Adding soft padding around the tree helps protect the coating.
Label the container so you remember to handle it with care the following season.
Final Thoughts
A flocked artificial Christmas tree brings a soft wintry feel to your décor, and with the right prep, application, and care, the snowy finish can last for many seasons. Whether you go for a light frost or a bold snow-covered look, steady layering, gentle handling, and smart storage all help keep the tree looking fresh year after year. With a bit of patience and a few simple tools, you can create a holiday centerpiece that feels warm, inviting, and ready for your favorite ornaments.